
Ready to tackle some home repairs without breaking a sweat? Whether you’re a seasoned DIYer or just starting out, these 15 house repair projects are approachable and can be done with a little time and creativity. You’ll save some cash, learn new skills, and maybe even have a bit of fun along the way!
Replacing Door Hardware
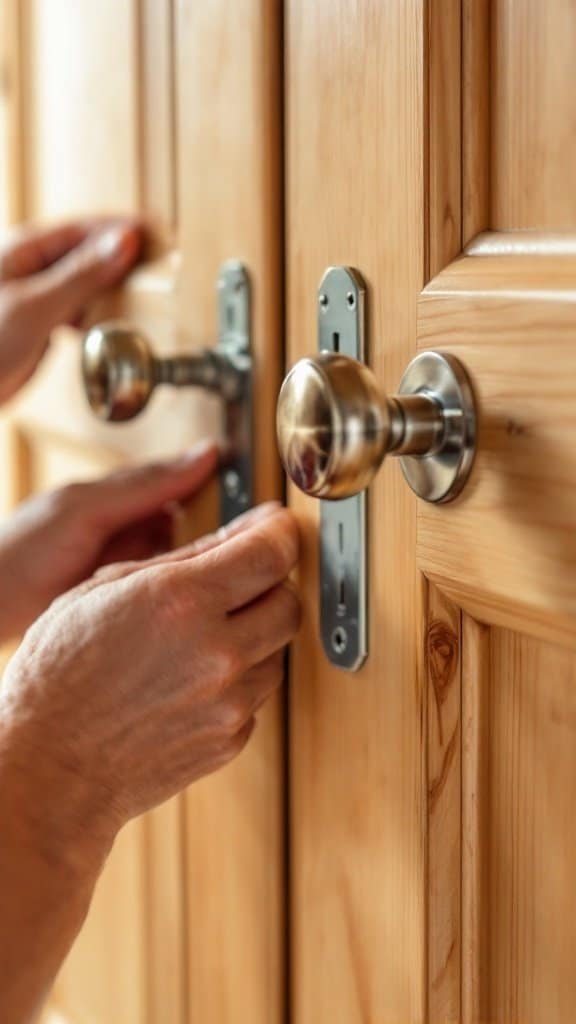
Replacing door hardware is one of those DIY tasks that can really spruce up your home without too much effort. In the image, you can see someone carefully installing new knobs on a wooden door. This simple change can make a big difference in the look and feel of a room.
First, gather your tools. You’ll typically need a screwdriver and possibly a drill. Make sure to choose hardware that complements your decor. Whether it’s sleek modern knobs or classic vintage styles, the options are endless.
The process is pretty straightforward. Start by removing the old hardware. Unscrew the knobs and the latch plate, as shown in the image. Then, fit the new hardware in place, making sure everything lines up correctly. Tighten the screws, and you’re done!
Not only does this project enhance the aesthetics of your doors, but it can also improve functionality. If your current knobs are hard to turn or sticky, new ones can fix that. So grab your tools and give your doors a fresh look!
Fixing a Leaky Faucet
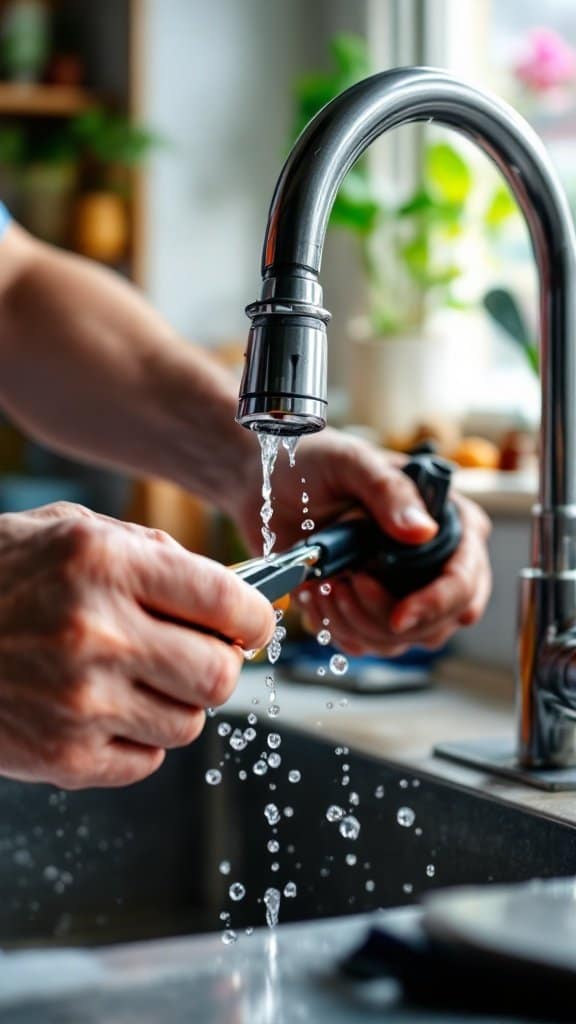
Dealing with a leaky faucet can be annoying. You might hear that constant drip, drip, drip, and start to wonder how to fix it. The good news? This is a simple DIY project that anyone can tackle!
The image captures someone in the process of fixing a faucet. You can see the water still running, which highlights the urgency of the situation. It’s a reminder that tackling this issue can save not only water but also money on your utility bill.
To get started, first turn off the water supply. This step is crucial, as it prevents any accidental flooding while you work. Once that’s done, you’ll need a few basic tools: a wrench, screwdriver, and possibly some replacement parts like washers or O-rings.
Next, take off the faucet handle and inspect the parts inside. Often, the culprit is a worn-out washer. Replacing this small component can make a big difference in stopping that annoying leak. After replacing any damaged parts, reassemble everything, turn the water back on, and check for leaks.
With a bit of patience and the right tools, you can fix a leaky faucet in no time. Plus, you’ll feel good knowing you handled it yourself!
Building a Garden Shed

Building a garden shed is a fun and practical project that can add value to your home. Just look at the image! You see a wooden structure, partially completed, nestled among the trees. The shed features a classic design with two large doors, making it easy to store gardening tools or outdoor equipment.
The unfinished roof shows that some work still needs to be done, which is part of the DIY charm. You’ll notice some leftover materials scattered around, a common sight during construction. This image perfectly captures the essence of a DIY project, where things can get a bit messy before they come together.
When planning your garden shed, consider the size and style that best fits your yard. You can customize it with shelves or windows to suit your needs. Whether you’re a seasoned builder or a beginner, you can tackle this project with some basic tools and materials. Plus, it’s a great way to spend a weekend outdoors.
So grab those tools and get started on your garden shed. It’s a project that not only enhances storage but also becomes a charming focal point in your garden.
Installing Peel-and-Stick Backsplash

Upgrading your kitchen doesn’t need to be a huge hassle, especially when it comes to installing a peel-and-stick backsplash. This project is not only budget-friendly but also a fun way to add some character to your space. The image shows a lovely black and white patterned backsplash that instantly brightens the kitchen.
The process is straightforward. First, make sure your wall is clean and dry. Then, measure your space and cut the backsplash tiles to fit. Once you’re ready, simply peel the backing and stick the tiles to the wall. It’s that easy! You can create a stunning focal point without any complicated tools.
In the image, you can see how the backsplash complements the sleek black cabinets and white countertops. The addition of plants and dishware adds a personal touch that makes the kitchen feel cozy. Don’t forget to consider color schemes that work with your existing decor to create a seamless look.
Sealing Drafty Windows

Drafty windows can be a major headache, especially during colder months. They let in chilly air and make your heating system work harder. Luckily, sealing them is a DIY project that’s easy and can save you money on energy bills.
The image shows someone working on a window, which perfectly illustrates the point. The person is using a power tool on a window frame, ensuring a snug fit. This kind of hands-on approach is all you need to tackle this task.
Start by checking for gaps around your windows. A simple inspection can reveal areas where air escapes. Once identified, you can use caulk or weather stripping to seal those gaps. It’s a straightforward process that requires minimal tools.
Another effective method is installing window film. This can help add an extra layer of insulation. The person in the image looks focused and determined, which is the kind of attitude you’ll need to get the job done.
So grab your tools and get ready to make your home cozier. Sealing drafty windows is a sensible project that anyone can do!
Updating Old Light Fixtures

Updating your light fixtures can instantly refresh your space, making it feel more modern and inviting. In the image, a person is shown replacing a stylish hanging light fixture. This kind of DIY project is not just practical; it also allows you to express your personal style.
Changing light fixtures can be a fun and easy weekend project. Start by selecting a design that matches your home’s aesthetic. Whether you prefer sleek and contemporary or warm and rustic, there’s something out there for everyone.
Once you’ve chosen your new fixture, make sure to gather the necessary tools. Basic tools like a screwdriver and wire connectors are often all you need. Don’t forget to turn off the power before you begin for safety!
In addition to aesthetics, consider the type of lighting you want to achieve. Different bulbs can create various moods, so take your time to choose the right ones. Whether it’s bright and airy or soft and cozy, updating your light fixtures can completely change the vibe of your home.
This simple update can elevate your living space without the need for extensive renovations. So, roll up your sleeves and give your home a fresh look!
Painting Kitchen Cabinets
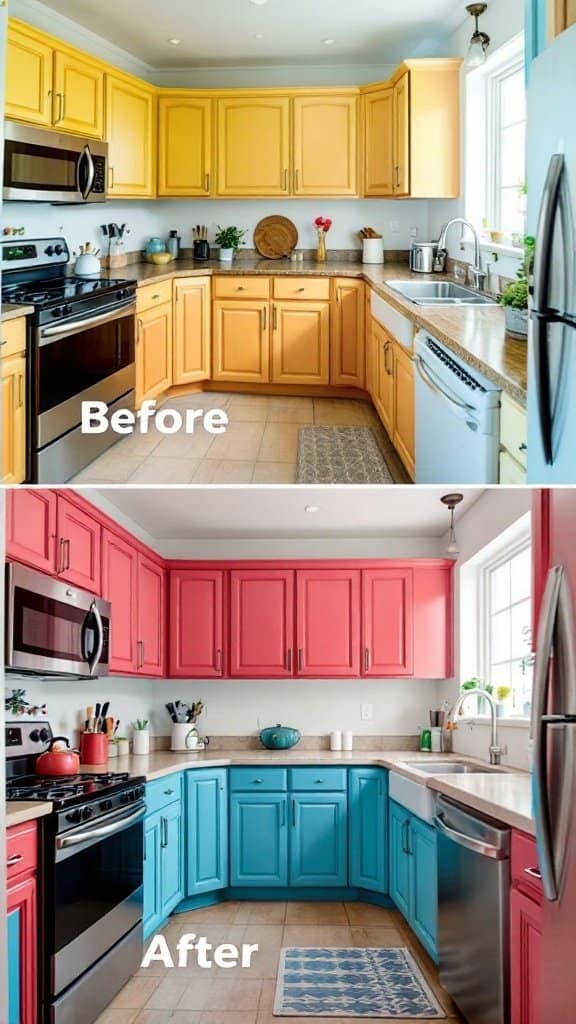
Transforming your kitchen can be as easy as giving your cabinets a fresh coat of paint. The image above shows a clear before-and-after comparison that highlights the impact of this simple DIY project.
The top image displays the kitchen with its original yellow cabinets, which may feel a bit dated. In the bottom image, the cabinets have been painted in vibrant colors: pink and blue. This change brings a fun and lively atmosphere to the space, making it feel more modern and inviting.
Choosing the right colors can greatly influence the mood of your kitchen. For a bold look, consider bright shades like those shown in the after image. If you prefer something more subtle, soft pastels or neutral tones can also do wonders.
Before you start, make sure to gather your supplies. You’ll need a good quality primer, paint, brushes, and possibly a roller for larger areas. Prep work is key—clean the cabinets thoroughly and sand them lightly for a smooth finish. Once you’ve done that, apply the primer, followed by your chosen paint color.
Painting kitchen cabinets is not just a cosmetic upgrade; it can also increase the value of your home. It’s a budget-friendly project that can be completed over a weekend. Plus, you’ll feel a sense of accomplishment when you see the transformation!
Repairing Drywall Holes
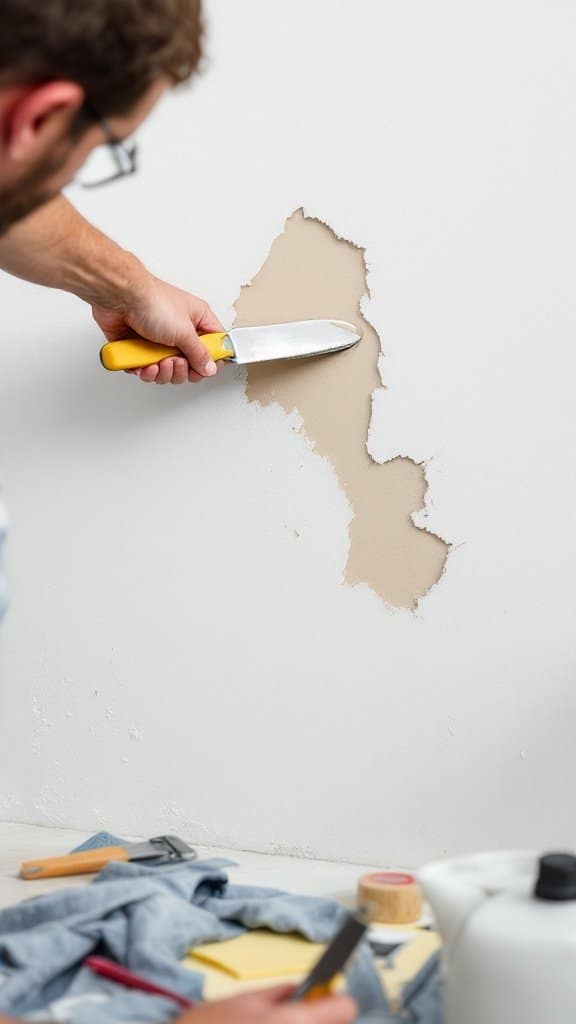
Have you ever had a mishap that left a hole in your drywall? Don’t worry! Repairing drywall holes is a project you can easily tackle yourself. In the picture, we see someone using a putty knife to fill in a small hole in the wall. This is a crucial step in restoring the wall’s appearance.
To get started, you’ll need some basic supplies like a putty knife, joint compound, sandpaper, and a bit of paint. First, clean the area around the hole to ensure the patch adheres well. Then, apply the joint compound smoothly over the hole. It’s important to feather the edges so it blends with the surrounding wall.
After it dries, use sandpaper to create a smooth surface. Once you’re satisfied with the repair, a fresh coat of paint can make it look as good as new. This is a small project that can really improve the overall look of your space!
Building a Fire Pit
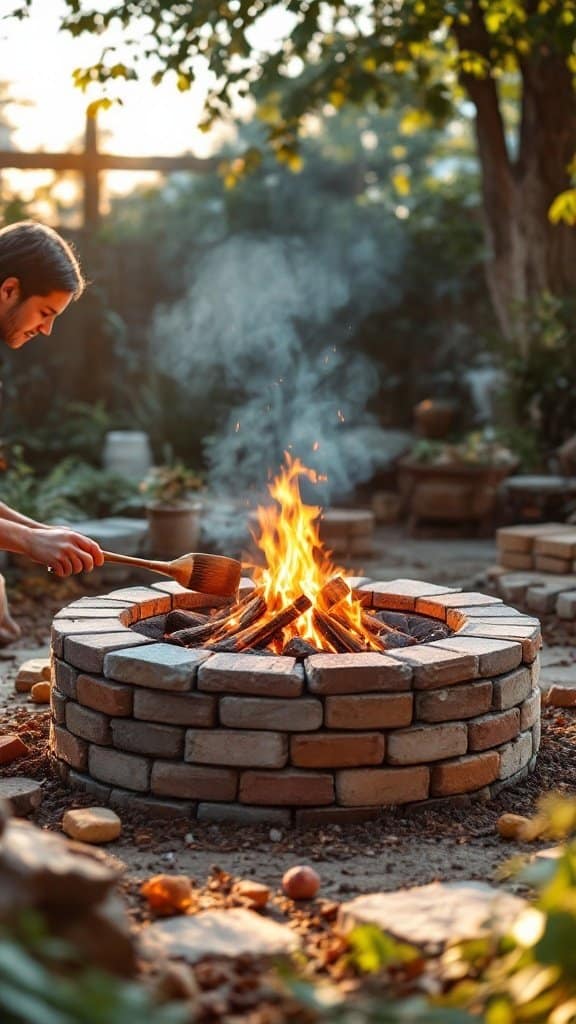
Creating a fire pit in your backyard can bring warmth and charm to your outdoor space. Picture gathering around a cozy flame with friends and family, roasting marshmallows, and sharing stories. The image shows a well-constructed fire pit made of bricks, surrounded by a natural setting. The flames dance, casting a warm glow as someone carefully tends to the fire.
To build a fire pit, you’ll need some basic materials and tools. Start with bricks or stones that can withstand heat. Make sure to choose a location away from overhanging branches and flammable structures. The setup is simple: dig a circular area, lay down sand for drainage, and start stacking your stones or bricks to form the pit.
Once your fire pit is built, enjoy the process of lighting the fire. Use dry wood and some kindling to get it going. Remember to always prioritize safety by keeping water nearby and ensuring that the fire is completely out before leaving it unattended. A DIY fire pit not only enhances your yard but also becomes a focal point for gatherings.
Laying Down Laminate Flooring
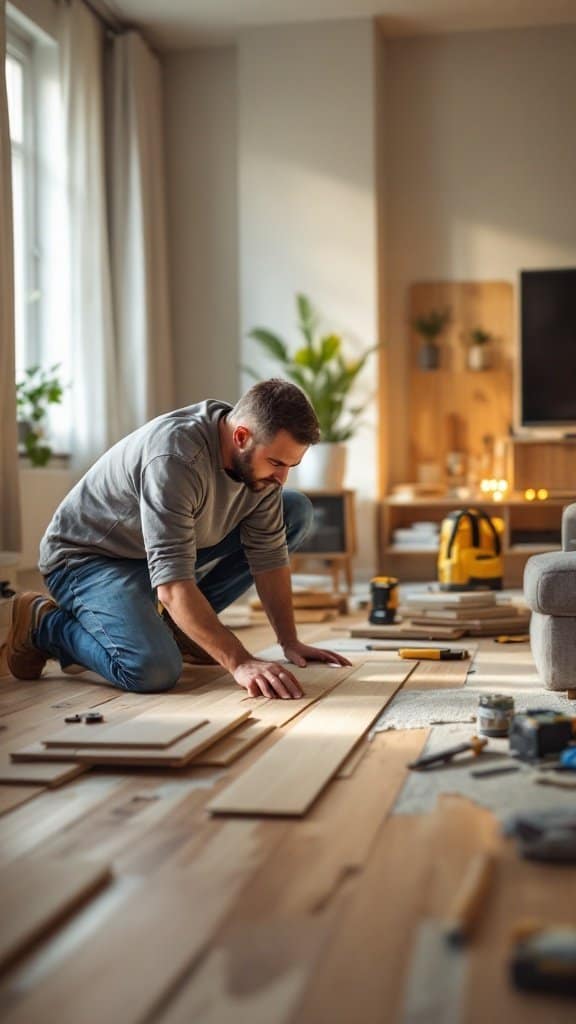
Laying down laminate flooring can be a fun and rewarding project. In the image, we see a person deeply focused on their task, surrounded by an array of tools and flooring pieces. This setup reflects the exciting yet challenging journey of transforming a living space.
Laminate flooring is a popular choice for many DIY enthusiasts. It’s relatively easy to install, making it perfect for those who want to enhance their home without a full renovation. As seen in the image, having the right tools handy can make the process smoother. A measuring tape, saw, and hammer are just a few essentials you’ll need.
Before you start, it’s important to prepare your workspace. Clear out furniture and clean the old flooring. Once you have a clear area, you can lay down a moisture barrier if needed. This step will help protect your new flooring from any potential water damage.
Next, begin by measuring and cutting your laminate pieces to fit your space. This part can be a little tricky, but take your time! As the person in the image demonstrates, kneeling down can help you get a better view and ensure accuracy.
Once your planks are cut, it’s time to start laying them down. Most laminate flooring clicks together, making installation straightforward. Just make sure to stagger your seams for a more natural look. Follow this with a thorough inspection to ensure everything is tight and secure.
After laying down the laminate, don’t forget to re-install your baseboards. This final touch can really make a difference in the overall appearance. And there you have it—a beautiful new floor that you installed yourself!
Creating a Custom Bookshelf
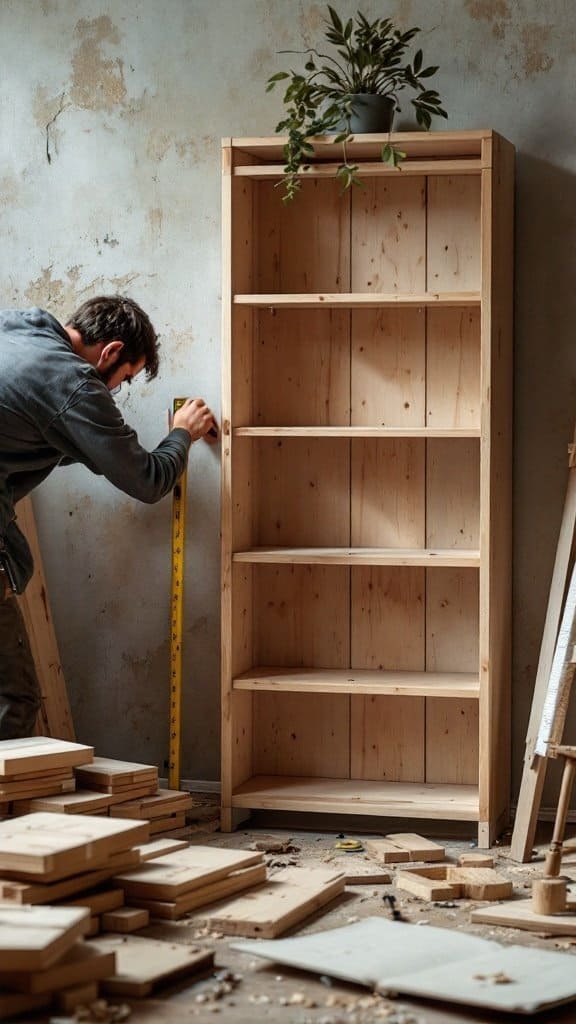
Building a custom bookshelf can be a fun and rewarding project. In the image, we see someone measuring and assembling a simple yet stylish wooden bookshelf. It’s a great way to add personal touch to your home while also being practical.
Getting started is easy. First, gather your materials. You’ll need wood boards, a saw, screws, and some basic tools. Make sure to decide on the size and design of your bookshelf before you begin cutting. Planning helps in avoiding mistakes and wasted materials.
The next step involves measuring and cutting the wood. This part is crucial for ensuring everything fits together nicely. The person in the image is using a measuring tape, showing how important it is to be precise. Once the pieces are cut, it’s time to assemble the frame and attach the shelves.
A custom bookshelf not only holds your favorite books but can also showcase family photos, plants, or decorative items. You can paint or stain it to match your room’s decor, adding a unique flair. Remember to secure it to the wall for safety, especially if you have kids or pets around.
With a little patience and creativity, you can create a beautiful bookshelf that fits your needs perfectly. This DIY project not only enhances your space but also gives you the satisfaction of making something with your own hands.
Installing a New Showerhead
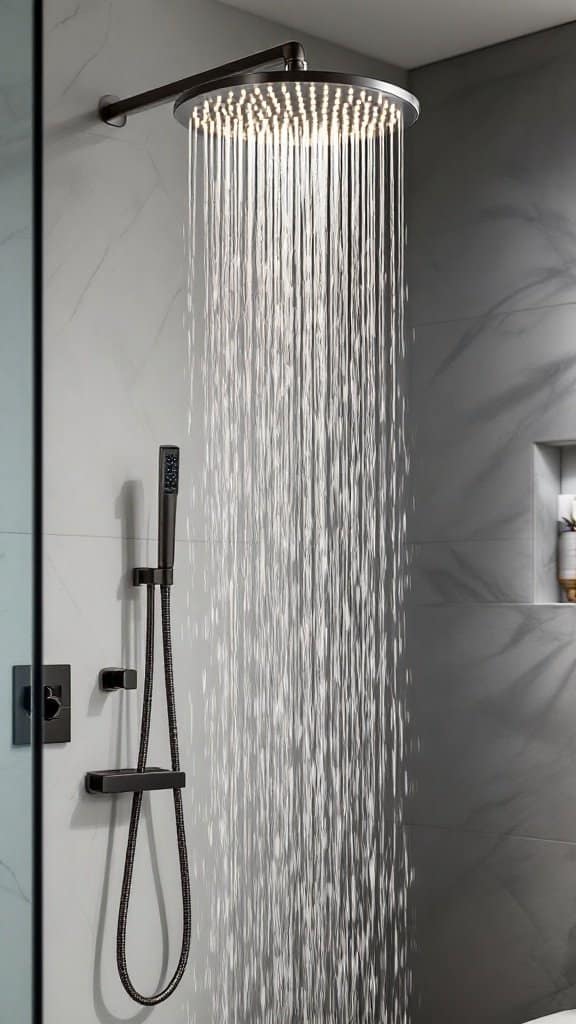
Upgrading your showerhead is a simple DIY project that can make a big difference in your bathroom. The image shows a sleek, modern showerhead with a beautiful design, creating a refreshing waterfall effect. It’s the kind of detail that can elevate your shower experience while also enhancing your bathroom’s overall look.
Before you get started, you’ll need a few basic tools: an adjustable wrench, plumber’s tape, and a new showerhead. You can find a variety of styles at your local hardware store, so pick one that fits your taste and budget.
The installation process is straightforward. First, turn off the water supply to your shower. Then, remove the old showerhead by unscrewing it counterclockwise. Clean the threads on the shower arm to ensure a good seal. Wrap plumber’s tape around the threads, and then screw on the new showerhead by turning it clockwise. Make sure it’s snug but don’t overtighten it.
After that, turn the water supply back on and check for leaks. If everything looks good, you’re ready to enjoy your new showerhead! This small change can bring a fresh vibe to your daily routine, making it a fun and satisfying project to tackle.
Creating an Outdoor Patio Area
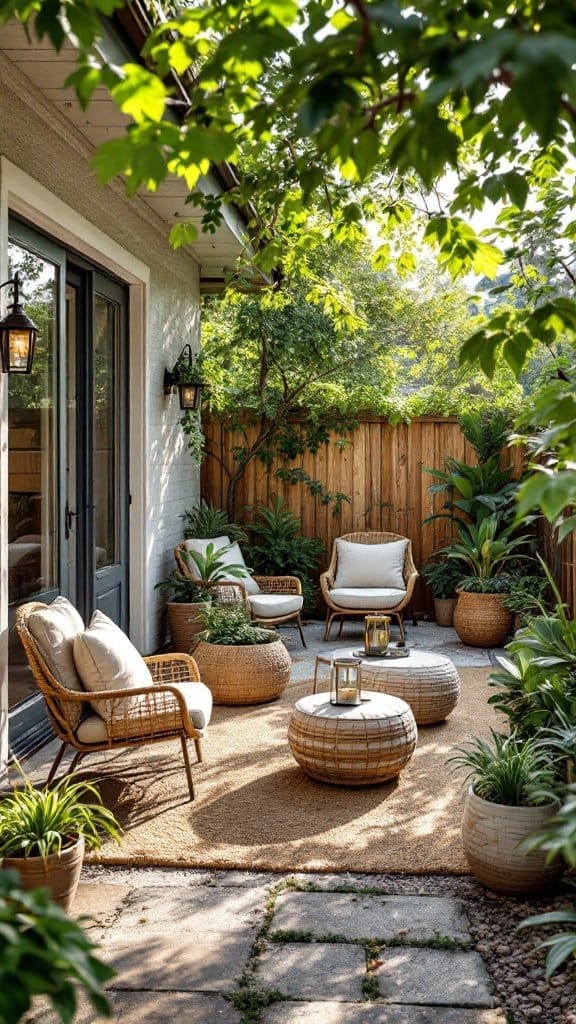
Transforming your outdoor space into a cozy patio can be a fun DIY project. Imagine a place where you can relax, entertain, and enjoy the fresh air. The image here shows a lovely patio area that is inviting and warm, perfect for gatherings or quiet moments.
The space features comfortable seating with soft cushions, inviting you to sit back and unwind. The relaxed vibe is enhanced by the natural elements around, including potted plants that add a splash of greenery. You can easily replicate this feel by selecting furniture that complements your style and fits the space you have.
Creating a patio doesn’t have to be complicated. Start with a clean surface and consider using pavers or gravel for a solid foundation. Add a few pieces of furniture, like a small table and some chairs, to create the perfect setting for sipping coffee or enjoying a meal outdoors. Don’t forget to include some plants to bring life to the area!
Patching Up the Roof

Patching up the roof is one of those DIY projects that feels rewarding once completed. In the image, you can see a person working diligently on a roof, surrounded by tools like nails and hammers. Wearing a helmet for safety, this person is focused on replacing shingles or fixing leaks, which are common issues for homeowners.
Whether you’re dealing with a small leak or just need to replace some worn-out shingles, it’s a task you can handle with a little patience and the right tools. Before you start, make sure you have everything you need: roofing nails, a hammer, new shingles, and a safety harness if you’re climbing up high.
First, inspect the roof to find any damaged areas. Once you’ve identified the problem spots, remove any damaged shingles carefully. After that, replace them with new ones, ensuring they’re properly aligned. A little sealant can help keep things watertight. Always remember to check the weather; it’s not a good idea to work on your roof when rain is in the forecast!
Refinishing Wood Furniture
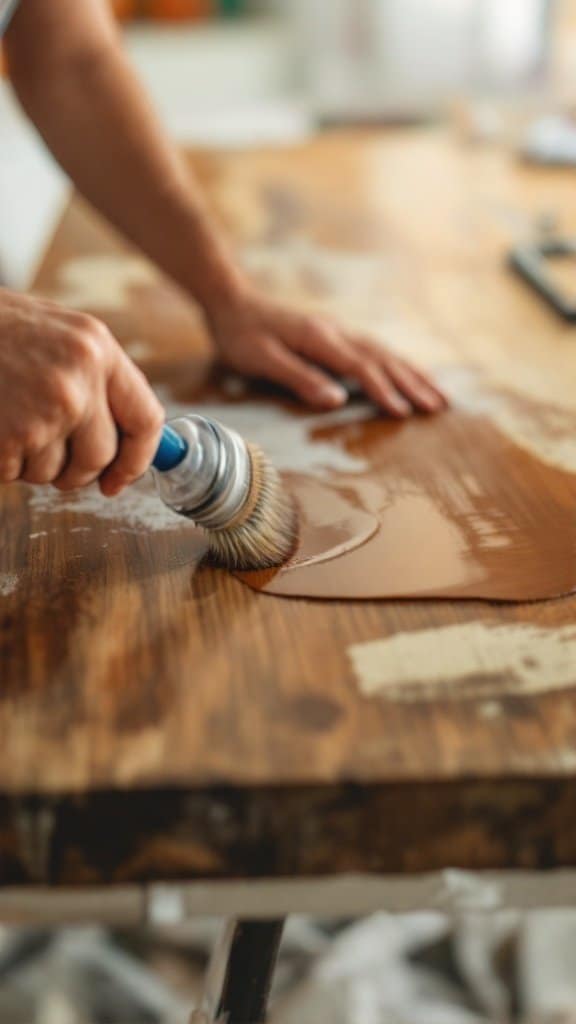
Refinishing wood furniture is a satisfying project that can breathe new life into tired pieces. The image shows a person applying a wood finish to a tabletop using a brush. This simple act can rejuvenate a worn-out surface, turning it into a beautiful focal point in your home.
Before diving in, it’s important to gather your materials. You’ll need sandpaper, a wood finish or stain, a brush, and some clean cloths. Start by lightly sanding the surface to remove any old finish and smooth out imperfections. This step is crucial for achieving a nice, even application.
Once you’ve prepped the surface, it’s time to apply the finish. Use a brush to spread it evenly across the wood, just like shown in the image. Remember to follow the wood grain for the best results. After you’ve applied the first coat, allow it to dry completely before deciding if it needs another layer.
Refinishing can be a fun way to express your style while saving money on new furniture. Plus, you’ll enjoy the sense of accomplishment that comes with completing a DIY project. Give it a try, and you might find a new favorite hobby!
This post may contain affiliate links which means I may receive a commission for purchases made through links. I will only recommend products that I have personally used! Learn more on my Private Policy page.